Full-stack web development "Hello World" tutorials for entrepreneurs with Rails, React, and Turbo :: Part 1 of 10

Last updated: January 13, 2021
This article kicks off a 10-part series of “Hello World” tutorials to teach full-stack web development for entrepreneurs. We’ll move quickly through the basics of code for web browsers (HTML, CSS, and JavaScript), Git, Shell scripting, Ruby on Rails (routes, controllers, models, views, and partials), Stimulus/StimulusReflex, Redux/React, Hotwire, and testing/linting in Ruby and JavaScript.
By the end of these basic tutorials - which collectively comprise an initial module within Part 1 of this broader set of software development tutorials I’m writing - you’ll be ready to dive into full-blown development with a real web app.
- “Hello World” Part 1: Git, HTML, and Embedded Ruby (below)
- "Hello World" Part 2: Shell Scripting and Cascading Style Sheets (CSS)
- "Hello World" Part 3: JavaScript and Ruby on Rails
- "Hello World" Part 4: Stimulus.js, StimulusReflex, and CableReady
- "Hello World" Part 5: Introducing Redux and React
- "Hello World" Part 6: Sending form data with Redux and React
- "Hello World" Part 7: Redux, Rails, and ActionCable
- Course update Dec 13, 2020
- Upgrading Rails
- "Hello World" Part 8: Hotwire with Turbo Frames and Turbo Streams
- Course update Dec 29, 2020
- How to upgrade Ruby versions for your Ruby on Rails app
- "Hello World" Part 9: Code formatting and linting
- "Hello World" Part 10: Automated testing
- More articles on the way, subscribe here to be notified when they are published!
Motivation
Teaching web development in the 2020s is profoundly different than it was a decade or two ago. While understanding the fundamentals of HTML, CSS, and JavaScript remains essential, there are now an overwhelming number of fantastic tools, languages, and libraries to choose from when architecting a “front-end” (i.e. code for web browsers) and a “back-end” (i.e. code for web servers).
In the first post in this new mega-tutorial series, I described the motivation, audience, and purpose of writing this series up. I didn’t go into too much detail regarding why the specific software stack was chosen (besides the fact that my partners and I use it professionally on a daily basis...and we are actively hiring apprentices), so it’s worth pausing for a moment to discuss the software stack and approach.
Why Rails?
I first began building Ruby on Rails applications in 2005, shortly after learning database-driven programming with PHP and MySQL. Ruby on Rails was - and largely still remains - a web development framework to facilitate the rapid building of software applications for web browsers. Over the last 15+ years, the Rails community has grown, evolved, and matured significantly. Many large companies run their software with Rails (such as Shopify and Github).
Therefore, while there are plenty of other fantastic server-side languages and frameworks to build applications with, the reason why I’m teaching Rails is because there are plenty of paying jobs out there that rely on it, the community is strong, and it’s a fantastic choice for building web/mobile software for startups.
In addition, learning Rails will provide you with the core fundamentals of web development that can be applied to countless other languages and frameworks for your future career.
Why introduce both Hotwire and React here?
Now, if your web/mobile developer friends are scanning this article series for you (which I’d recommend you have them do!), they are probably wondering why I’m introducing both Hotwire and ReactJS. Afterall, these are two fundamentally different approaches for building reactive web applications in the browser (i.e. fast, “native”-like experiences; as if it were software installed directly on your computer or phone).
In short, there are three main reasons why I’m introducing both:
- Because it is important for students to understand meta-level JavaScript frameworks compared to “HTML over the wire” approaches toward creating delightful user experiences.
- Because, practically, the Rails community is doubling down on Hotwire and HTML-over-the-wire tooling, and for most startup applications this will save developers a significant amount of time compared to maintaining a separate front-end codebase.
- And finally, because it’s possible that by the time this tutorial series is completed, it will be clear that one or the other approach becomes the dominant paradigm for building web (and mobile!) apps.
In addition, DHH himself (the creator of Rails) writes in the preamble to the Stimulus Handbook:
“Furthermore, you don’t even have to choose. Stimulus and Turbo work great in conjunction with other, heavier approaches. If 80% of your application does not warrant the big rig, consider using our two-pack punch for that. Then roll out the heavy machinery for the part of your application that can really benefit from it.”
And that is indeed how we’ll approach it. In later posts we’ll dive in with Hotwire and React /Redux after Stimulus and StimulusReflex, in preparation for the extra credit opportunity to build a more “heavy machinery” React app if desired.
But first, let’s start with the basics. :)
Git Setup & HTML with Embedded Ruby
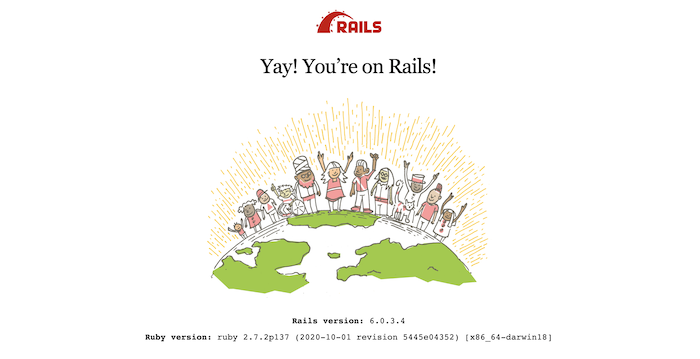
Hypertext Markup Language (HTML) is the fundamental language of web browsers. As the language has evolved, it has become more about identifying parts of a document (e.g. header, nav, sections, paragraphs, etc..) and less about how the document looks to end users (that is what CSS is for, which we’ll talk about in a future post in this series). For now, we’re going to jump right in from where you left off from the Windows setup or Mac Setup tutorial from before, with a Rails web server fired up on port 3000 on your machine and a web browser tab that looks something like this:
At the time of this writing, Ruby 2.7 is the latest version and Rails 6.1 isn’t quite yet out. You’ll want to make sure you are on the latest versions of each.
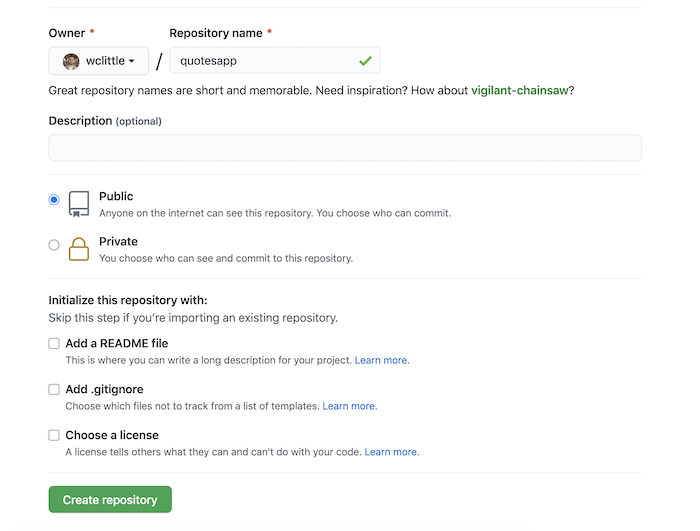
Before we get started, go to https://github.com/new and be sure to be logged in as your GitHub user. Enter “quotesapp” for your repository name, leave it to be “public” if you’d like (or private is fine, too), and don’t check any of the initializing checkboxes:
After you create your new repository, make sure you are in your terminal at the root of the quotesapp folder, then - assuming you have already setup your login details and authentication with Github (Mac users, you may need to read the relevant sections from the windows tutorial to get your ssh setup) - enter the following (be sure to replace in your Github username where it says YOUR_USERNAME below):
- git init
- git remote add origin git@github.com:YOUR_USERNAME/quotesapp.git
- git add .
- git commit -m "first commit; vanilla Rails install"
- git push --set-upstream origin master
Good. Now you have successfully captured the initial state of your Rails app and pushed that “commit” up to your Github repository for safe keeping. As we go along, we’ll make changes to our code and push commits up to Gihub so we can keep track of progress.
In real-life situations in a team, you will work on a “branch” within git, push commits to that branch, then go through a code review process (e.g. by first opening a “pull request”) to have that branch reviewed and merged into your project’s master branch. We’ll talk through that process later in this tutorial series. For now, we’ll be pushing commits directly to your master branch.
If you have time now to pause here to learn more about Git, I’d highly recommend https://learngitbranching.js.org/
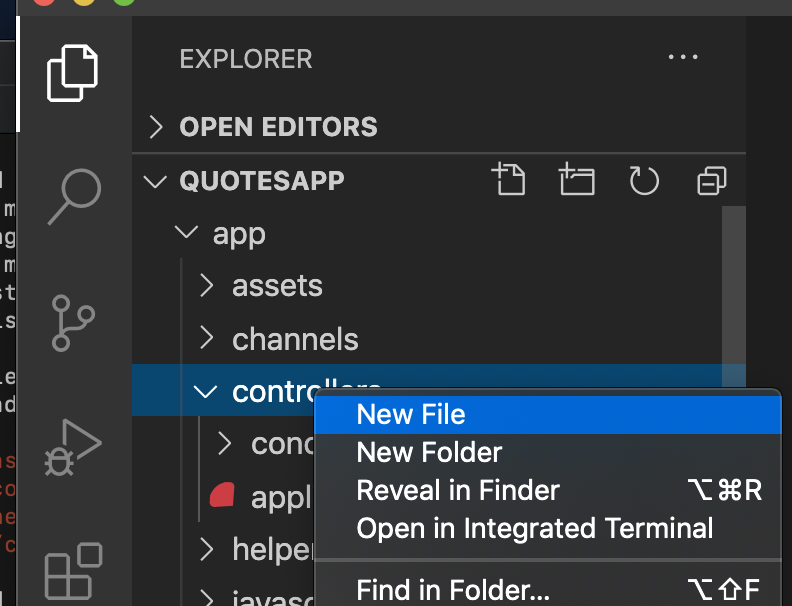
If you are ready to dive in and get started here, we’re first going to create a controller in Rails called “Welcome”.
In your code editor (Visual Studio Code, which we’ll refer to as simply “VSC”), make sure to have your quotesapp folder loaded (File -> Open, then select your quotesapp folder). Then, in your directory view, click into your “app” folder and then right-click on your “controller” folder:
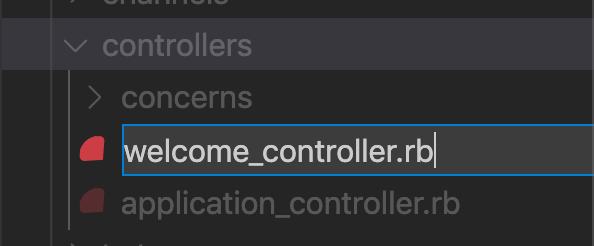
And create a new file called welcome_controller.rb
In that file, have it contain:
class WelcomeController < ApplicationController
    def index; end
end
Save the file.
Rails works in what’s called a “Model-View-Controller” architecture (MVC), where - simply put - variables are set up in a controller file and passed to a view to render what you want seen in the browser. Along the way, we’ll create models (such as “quotes”) that can be setup in our controllers before they are passed into our views.
We’ll talk a LOT more about that as we go, so don’t worry if it doesn’t make sense yet.
Next we’re going to create a folder in app>views called welcome (right click on views and create the new folder).
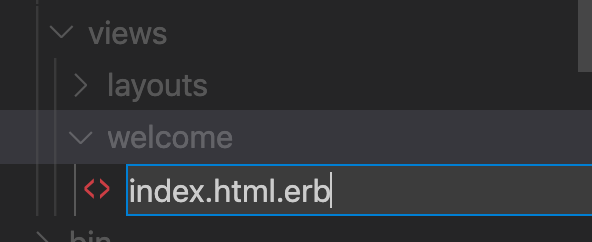
Next we are going to right-click on that new welcome folder to create a file called index.html.erb:
And in that file we are going to enter:
<h1>Hello World!</h1>Save the file.
Finally, we’re going to open up our route.rb file (it’s in the config folder at our quotes app root) and enter on line 3:
root to: 'welcome#index'So your file should look like this:

Save the file.
Now, if your web server isn’t already running, be sure to have “rails s” entered in your terminal from your quotesapp root so the web server fires up to listen on port 3000 (it will do so automatically).
Go to http://localhost:3000 and you should see:
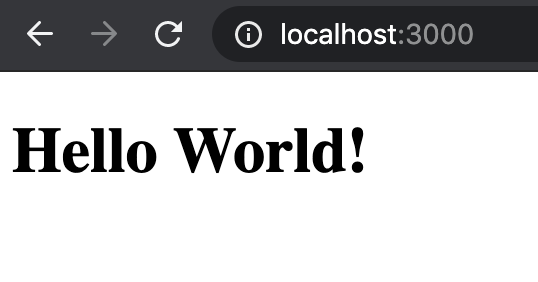
Great ! We just completed our first hello world step in this tutorial.
What just happened?
When you first load up a vanilla Rails install, there are no routes, controllers, views, or models set up, so Rails by default shows that “Yay! You’re on Rails!” page. What we did was setup our first controller, our first method in that controller called “index”, our first “view” file called index.html.erb that corresponds to that index method, and we pointed our default “root” route to our index method in the welcome controller so that when we go to “/” in our web browser it will load up the contents of that method (i.e. our Hello World heading).
Now, there’s an important setup here that Rails took care for us in the background. If you open up the file app>views>layouts>application.html.erb you will see the following:
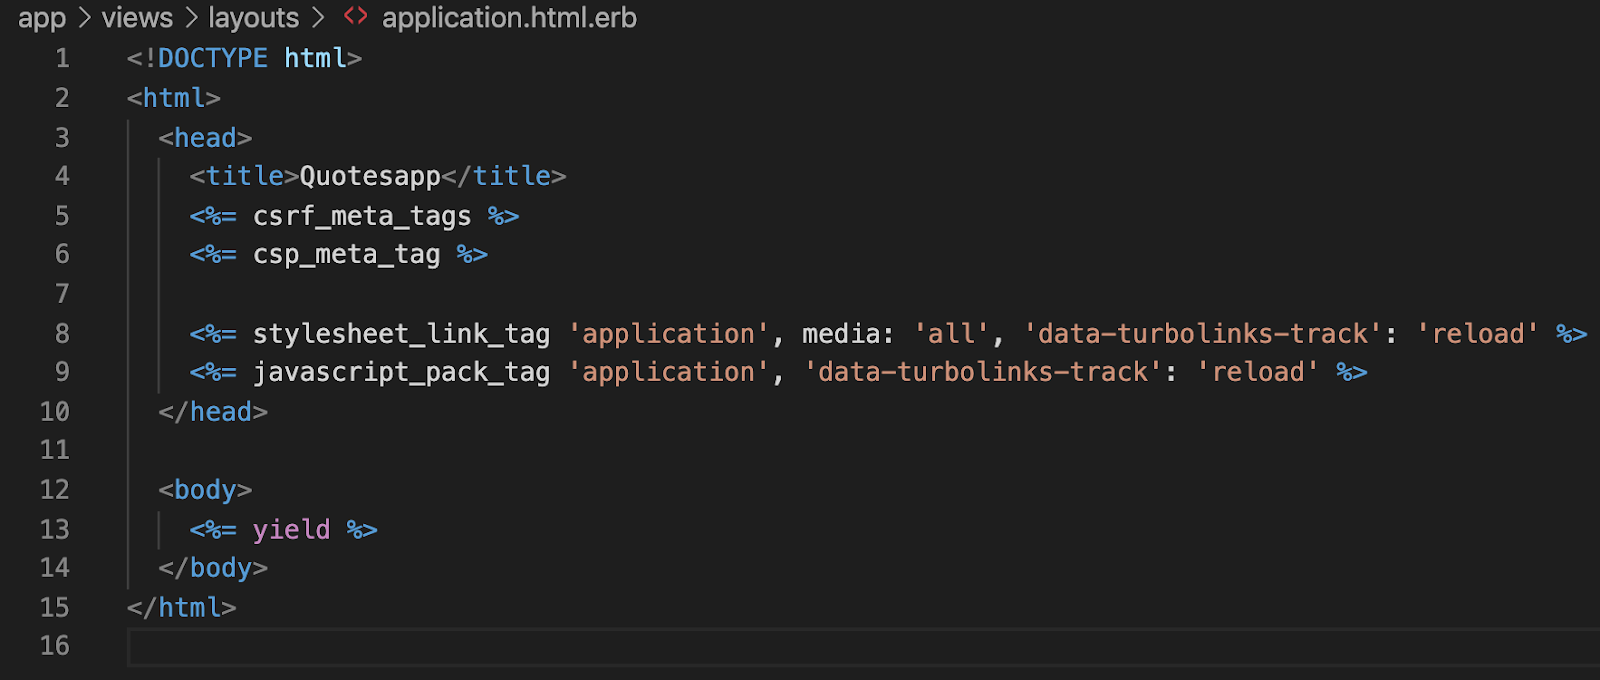
In reality, this is the base layout that is being sent to the web browser. Here’s what the lines mean:
- <!DOCTYPE html> This is the declaration tab to let browsers know we are expecting HTML here.
- The <html> tag introduces the opening of the document to be read (note that this tag is “closed” on line 15 with a </html>)
- The <head> tag - closed on line 10 - contains our metadata for the document that will be read behind the scenes by web browsers.
- The <title> tag tells our browser tab what the title of our document is. This is the title that search engines like Google will display in their results when you search for things.
- The csrf output on line 5 is our first example of Embedded Ruby in this file. You’ll note that our application layout file here ends in “.html.erb” which means that it’s an HTML document with embedded ruby in it. What the csrf meta tags are intended to do is protect us from Cross-Site Request Forgery attacks. One of the advantages of Rails is that it bakes in security like this for us. If you “view source” in your web browser (right-click -> view source), you’ll see the output of that embedded ruby, which is two meta tags that help ensure forms sent from our web app are authentic:
- The CSP meta tag is for protecting us against things like cross-site scripting attacks via a Content Security Policy that Rails can setup for us when we dive deeper into JavaScript later in this series.
- Blank space for readability :)
- Here is where our stylesheets are loaded to make our document look how we want it to look. We’ll talk more about CSS in a future post in this series. The Turbolinks tracking thing is to help make our page loads faster, which we’ll talk about more later in this series as well.
- Similar to our CSS, line 9 is where we are loading in our JavaScript “pack” called application, which we’ll talk about more later in this series.
- Closing our head tag
- Blank space for readability.
- This is our opening <body> tag that tells web browsers what to expect to output on our screens.
- This yield method in our Embedded Ruby is what tells Rails to output the contents of our controller method based on the route from the URL entered in the browser. Since our route is “/” (a.k.a the web application “root”), we told Rails to go looking at our index method in our welcome controller, which ultimately yields the contents of our index.html.erb view file.
- Close the body tag
- Close the html tag and end our document.

That’s it! Pretty cool, huh? If we look at all the contents of our “View Source” we see:
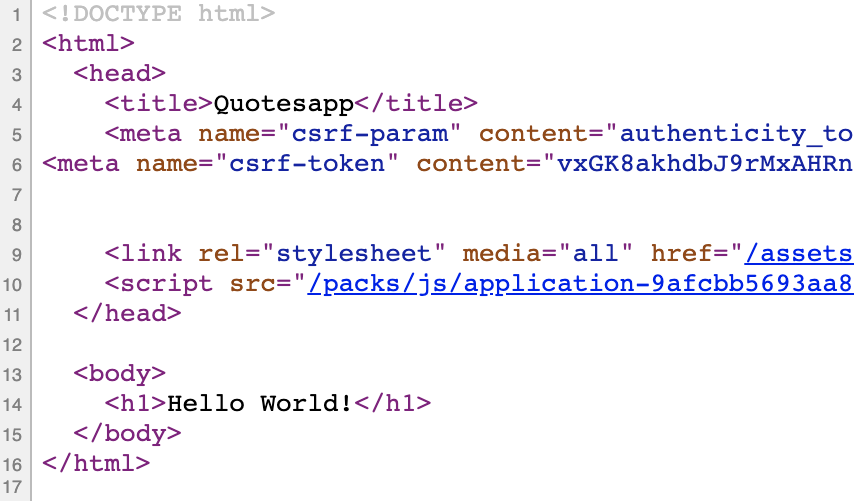
All those strings of characters are meant to protect our app (in the case of the csrf-token) or give our asset files (CSS and JavaScript) a “fingerprint” to make it easier for us to let our users’ browsers pick up changes when we deploy new code.
Before we move onto the next session, let’s go ahead and create a commit and push it to github to save our progress. It’s good to start with a git status command:
- git status
You should see something like this:

The file and folder below are obviously the new things we’ve added, and to see what we changed in that routes file, let’s do a:
- git diff
Which should print out the following:

This shows us that we’re about to commit a change where we’ve added our root route. In general it is always a good idea to run a git status and git diff to see what you are about to commit.
In VCS, you can also click over to the Source Control section to see your code changes a different way:

Finally, assuming your changes look like this commit diff, let’s go back to our terminal and add, commit, and push the files:
- git add .
- git commit -a -m "create a welcome controller, index view, root route, and hello world example in html"
- git push
You should see output that you successfully pushed that commit up to your Github account!
Continue to the next post: Part 2: Shell Scripting and Cascading Style Sheets (CSS)
Comments
Interested in participating in the comments on this article? Sign up/in to get started:
By signing up/in with Satchel you are agreeing to our terms & conditions and privacy policy.