How to merge HTML, CSS, and JavaScript into your Rails app

Continuing forward in our introduction to web and mobile development tutorial series, here we'll learn how to merge into our Rails app the basic HTML, CSS, and JavaScript that our UI designer (Tim) quickly built for us.
[Author's note: I wrote the first couple dozen tutorials in this series a few years ago and I'm in the process of updating the content to reflect the evolution of best practices in the industry. Please comment if you see anything I missed that should be updated. Thanks!]
FIRST, CAREFULLY READ YOUR UI DESIGNER'S README
After we worked with Tim to develop our mockups, he spent time documenting how he went about cutting them up into HTML, CSS/Sass, and JavaScript. This is worth reading in whole:
WEBAPP
dashboard.html — contains four columns of four types of cards — users, agenda items, action items, and meetings.
user_action_modals.html — this file includes all the code needed for the User and Action item modals/nodes/popups. Includes some default content for reference.
agenda_meetings_modals.html — this file includes all the code needed for the Agenda item and meeting modals/nodes/popups. Includes some default content for reference.
create_modal.html — appears when ‘+' is activated on a dashboard column, opens a new modal/node to create a new agenda item, action item, or meeting card)
CSS & SCSS
_reset.scss includes normalize.css for resetting basic html elements to a “normal” baseline across all major browsers. Is imported to styles.scss.
_layout.scss includes all code needed for the fluid grid, site/app container and clearfix (for parent elements that have no height and do not clear their floated children). Is imported to styles.scss. See “the fluid grid” below for more details.
_type.scss includes all basic typographic styles, such as the basic type styles applied all throughout the site and app, links, and headers. Is imported to styles.scss.
_general.scss includes general styles applied throughout the site and app, such as buttons, inputs, navigation menus, and styling for site elements. Is imported to styles.scss.
_app.scss includes all webapp specific styles. Applies to dashboard, and modals/nodes. Is imported to styles.scss.
_variables.scss contains all variables used (for hex colors) and mixins for the gradients and box shadows used on buttons. Is not imported to styles.scss as sass variables and mixins do not get compiled.
styles.scss imports above files and compiles to css/styles.css.
JAVASCRIPT
css3-mediaqueries.js gives media query support to IE8. Is called through a conditional comment that targets IE browsers below IE9 and IE mobile devices.
tabs.js — I attempted to write my own javascript code for tab functionality, but that didn't work out very well, so I ended up using this tutorial for the tabs and modified the code as needed. Used only on the agenda_meeting_modals.html and user_action_modals.html
I experimented with using some jQuery plugins for the modal/node/popups (have them appear when corresponding card is activated on the dashboard), but all I could find were plugins that required the modal code to be embedded in the dashboard code, which I didn't think would be of any help for the final product?
THE FLUID GRID
Note: I used ems instead of pixels, as the fluid grid works best with relative units of measurement. Ems are relative to the base font size, which in this case is usually 16px (the typical browser default), as determined by the base font-size value of 100%. If you want to change pixels to ems, just take the pixel measurement, say a box with a 500px width, divide by the base font size (16px) and you get a box with a 31.25em width. Now an easy way to scale down elements with em measurements on smaller screen sizes is to just scale down the base font size and everything measured in ems will follow suit.
The responsive aspect to this project is fairly simple. For the sake of those who are following along with the blog posts/ebook, I tried to create the simplest grid I know. It might be good to note that this grid probably isn't robust enough for more complex layouts.
Everything is wrapped in a container, which provides a maximum width and basic background styling for the site and app. Then everything is wrapped again in a grid that provides padding on the sides. I used this so that some elements, like the hero banner, can live outside of this grid and stretch all the way to the edges of the container.
The grid is comprised of four columns. When the screen has a width of at least 10em (any phone pretty much with a width of 240px and up), all 4 columns stack on top of each other and each one has a width of 98%.
When the screen or browser has a width of at least 52em, the columns float next to each and a single column has a width of 22% (height is determined by the content contained within). Columns have a 1.5% margin around them at all times. A single column has the class name col_1.
If you wanted a component or element to span two columns, or half of the container, you would give it a class of col_2. These “double” columns have a width of 47%. For something that spans 3 columns use the class col_3 (72% of the container) and for the entire width of the container use col_4 (97% of the container).
For the app dashboard I have set a special case in which the single columns turn into double columns at a minimum width of 40em. They don't revert back to single columns until a min width of 75em.
When the screen/browser window scales down, I used media queries to adjust elements to make everything fit together nicely as the screen gets smaller. For the most part I used min-width media queries for really general things, like the fluid grid, and max-width queries for small details and really specific elements.
Ok. Good to know. This is the world of front-end UI/UX development, folks. While getting into the fine details of how Tim created these cutups is outside the scope of this tutorial series, as we hook things up you'll learn a ton about that world, especially responsive web design (RWD) considerations like ems, percentages, and media queries. It will also give you an appreciation for why a visual designer who can prototype in HTML/CSS/JS is critically important (of course) and why she/he should be a different person than the lead web developer (in this case, me/you).
Now, of course, as a lead web developer these days you HAVE to know your way around both the back-end and front-end. This means Rails is just part of the solution. You'll also need to become familiar with a front-end framework likeBackbone, Angular, and Ember. In this series we'll start with Backbone (see our introductions here and here) and hopefully introduce Angular and Ember as bonus material later.
START YOUR MERGE PROCESS WITH A TEST!
Ok — moving forward in Behavior-Driven Development (BDD) fashion as we worked to setup in our previous post, let's start by creating a folder within our spec/ folder called features and then create a file in there called visitor_visits_public_pages_spec.rb and put this in it:
#spec/features/visitor_visits_public_pages_spec.rb
require 'spec_helper'
feature 'Visitor visits' do
  scenario 'the home page' do
    visit root_path
    page.should have_content("About")
  end
end
What we're setting up here is a very basic integration test. Our “feature” will eventually have multiple “scenario” sections that mimic specific visitor behaviors.
In this first scenario, we are testing the expected behavior when a visitor visits the home page. Since the word “About” is in our simple nav bar at the top, we should expect the page to have that content.
So, let's see what happens. Run the test:
$ rspec ./spec/features/visitor_visits_public_pages_spec.rb

Visitor visits the home page (FAILED - 1)

Failures:

1) Visitor visits the home page
     Failure/Error: visit root_path
     NameError:
       undefined local variable or method `root_path' for #<RSpec::Core::ExampleGroup::Nested_1:0x007fb6362acdc8>
     # ./spec/features/visitor_visits_public_pages_spec.rb:5:in `block (2 levels) in <top (required)>'

Finished in 0.00156 seconds
1 example, 1 failure

Failed examples:

rspec ./spec/features/visitor_visits_public_pages_spec.rb:4 # Visitor visits the home page

Randomized with seed 31879
Ok — now it's time to work toward making it pass. The first issue here is that our “root_path” isn't a defined method. Since routing paths are defined ourconfig/routes.rb file let's open up that file and uncomment this key line and replace “welcome” with “home”:
#config/routes.rb
. . .
  # You can have the root of your site routed with "root"
  root 'home#index'
. . .
Cool, now we've defined our root_path. So let's see what happens when we run our test again:
$ rspec ./spec/features/visitor_visits_public_pages_spec.rb

Visitor visits
  the home page (FAILED - 1)

Failures:

 1) Visitor visits the home page
     Failure/Error: visit root_path
     ActionController::RoutingError:
       uninitialized constant HomeController
     # ./spec/features/visitor_visits_public_pages_spec.rb:5:in `block (2 levels) in <top (required)>

Finished in 0.04082 seconds
1 example, 1 failure

Failed examples:

rspec ./spec/features/visitor_visits_public_pages_spec.rb:4 # Visitor visits the home page

Randomized with seed 12027
Ah ha! We need to go create a HomeController. Let's do it:
$ rails g controller Home
      create  app/controllers/home_controller.rb
      invoke  erb
      create    app/views/home
      invoke  rspec
      create    spec/controllers/home_controller_spec.rb
      invoke  helper
      create    app/helpers/home_helper.rb
      invoke    rspec
      invoke  assets
      invoke    coffee
      invoke    scss
Rails makes that easy. Alright, let's run our test again (now you are really seeing how TDD/BDD works…i.e. lots of these little iterations):
$ rspec ./spec/features/visitor_visits_public_pages_spec.rb

Visitor visits
  the home page (FAILED - 1)

Failures:

 1) Visitor visits the home page
     Failure/Error: visit root_path
     AbstractController::ActionNotFound:
       The action 'index' could not be found for HomeController
     # ./spec/features/visitor_visits_public_pages_spec.rb:5:in `block (2 levels) in <top (required)>

Finished in 0.04904 seconds
1 example, 1 failure

Failed examples:

rspec ./spec/features/visitor_visits_public_pages_spec.rb:4 # Visitor visits the home page

Randomized with seed 49509
Ok. Open up your app/controllers/home_controller.rb file and let's add an index method:
#app/controllers/home_controller.rb
class HomeController < ApplicationController
  def index
  end
end
..and then run the test again:
$ rspec ./spec/features/visitor_visits_public_pages_spec.rb

Visitor visits
  the home page (FAILED - 1)

Failures:

  1) Visitor visits the home page
     Failure/Error: visit root_path
     ActionView::MissingTemplate:
       Missing template home/index, application/index with {:locale=>[:en], :formats=>[:html], :handlers=>[:erb, :builder, :raw, :ruby, :jbuilder, :coffee]}. Searched in:
         * "[..]OurAgendaApp/app/views"
     # ./spec/features/visitor_visits_public_pages_spec.rb:5:in `block (2 levels) in <top (required)>

Finished in 0.05668 seconds
1 example, 1 failure

Failed examples:

rspec ./spec/features/visitor_visits_public_pages_spec.rb:4 # Visitor visits the home page

Randomized with seed 8424
Good. Making progress. This error means we don't yet have a template file (a view) for our index action anywhere in our views folder. Rails expects a folder named “home” to match the controller name and a file in it named “index.*” (in our case it will be index.html.erb since we are planning to return HTML with Embedded Ruby in it). So go make that folder and file (that is:app/views/home/index.html.erb), leave it blank for now, and run the test again:
$ rspec ./spec/features/visitor_visits_public_pages_spec.rb

Visitor visits
  the home page (FAILED - 1)

Failures:

  1) Visitor visits the home page
     Failure/Error: page.should have_content("About")
       expected to find text "About" in ""
     # ./spec/features/visitor_visits_public_pages_spec.rb:6:in `block (2 levels) in <top (required)>

1 example, 1 failure

Failed examples:

rspec ./spec/features/visitor_visits_public_pages_spec.rb:4 # Visitor visits the home page

Randomized with seed 5168
Ok — good — this means we are ready to merge in Tim's cutups so our test can find the word “About”.
MERGE IN THE CSS AND JS FIRST
Now's it's time to go ahead and fork the cutups repository fromhttps://github.com/timothymalcham/OAA-web-app into your personal Github profile. It's pretty easy to just click the “Fork” button on the top right and you'll figure it out, but here is a quick tutorial if you need help.
Once you've done that, clone the repository from your Github account onto your local machine in a new folder outside the OurAgendaApp folder. I have an “apps” folder on my machine, so in my case I would go to that folder and:
$ git clone <a href="https://github.com/wclittle/OAA-web-app.git">https://github.com/wclittle/OAA-web-app.git</a> OAA_cutups
Cloning into 'OAA_cutups'...
remote: Reusing existing pack: 40, done.
remote: Total 40 (delta 0), reused 0 (delta 0)
Unpacking objects: 100% (40/40), done.
Checking connectivity... done.
Did you remember to replace “wclittle” (which is my github username) with your own username? If not, delete that folder and try again. Once you're ready, copy over the assets:
$ cp OAA_cutups/js/*.js OurAgendaApp/app/assets/javascripts/
$ cp OAA_cutups/images/*.png OurAgendaApp/app/assets/images/
$ cp OAA_cutups/scss/*.scss OurAgendaApp/app/assets/stylesheets/
And now it's important to modify our main CSS manifest file so we ensure our stylesheets are loaded in correctly:
/* app/assets/stylesheets/application.css */
/*
...
 *= require_self
 *= require styles
*/
It important to remove the “require_tree .” line since we want to only import our styles file, which already has the imports in the correct order. CSS style ordering is critically important. Our app would look jacked up if we just “required” all the files and subfolder files in alphabetic order (that's what “require_tree .” does).
Let's do the same thing with our javascript:
// app/assets/javascripts/application.js
...
//= require jquery
//= require jquery_ujs
//= require turbolinks
//= require tabs
You'll notice rails loads in jquery stuff and turbolinks (which speeds up our users' page loads as they click around). For now, we'll leave in the .coffee files that were created automatically for our controllers (same with the .scss files over in our stylesheets folder). But we'll need to remember to require them appropriately if we want to use them down the road.
To finish up the asset merge, you'll need to open up theapp/assets/stylesheets/_general.scss file and substitute in the image-url() method on lines 191, 202, and 213 like so:
...
  background-image: image-url('twitter-64.png');
  ...
  background-image: image-url('facebook-64.png');
  ...
  background-image: image-url('googleplus-64.png');
...
This ensures we always load our images from the appropriate place (more on this in later tutorials)
Now, jump back into our OurAgendaApp folder in your terminal and run the “rspec ./spec/features/visitor_visits_public_pages_spec.rb” test again to ensure you get the same error as before (i.e. not finding “About” on the page). If you get any other error it means you messed something up on the assets import. Go back and fix it before you move forward here.
FINALLY, LET'S MERGE IN THE HTML AND ADD SOME ERB
The first thing you want to do is open up your “app/views/layouts/application.html.erb” file and merge in the markup from Tim's “homepage.html” file that is going to be on all our pages:
This is essentially the top part of your view layer, which in Rails is normally a set of nested views and view partials. You'll notice I called global variables for our page title and description (which we'll set in our controllers). I also left most of the markup to be included in the index.html.erb page, but you'll see I did put a footer partial in there. Let's go ahead and run our test again and see what happens:
$ rspec ./spec/features/visitor_visits_public_pages_spec.rb

Visitor visits
  the home page (FAILED - 1)

Failures:

1) Visitor visits the home page
     Failure/Error: visit root_path
     ActionView::Template::Error:
       Missing partial home/footer with {:locale=>[:en], :formats=>[:html], :handlers=>[:erb, :builder, :raw, :ruby, :jbuilder, :coffee]}. Searched in:
         * "[..]OurAgendaApp/app/views"
     # ./app/views/layouts/application.html.erb:16:in `_app_views_layouts_application_html_erb__3987517836118682158_70212029708560'
     # ./spec/features/visitor_visits_public_pages_spec.rb:5:in `block (2 levels) in <top (required)>

Finished in 0.09381 seconds
1 example, 1 failure

Failed examples:

rspec ./spec/features/visitor_visits_public_pages_spec.rb:4 # Visitor visits the home page

Randomized with seed 52426
Right, we need to create our footer partial, so let's go ahead and do this. Create the file app/views/home/_footer.html.erb:
<div class="footer">

 <div class="footer_content">
   <p>footer information will go here</p>

  </div>

</div>
Now run your test again and it should give you that previous error about not finding “About”
All set? Ok, finally let's populate our index.html.erb file, remember to substitute in the asset_path method to source our assets:
Now run the test again and you should see it pass!
$ rspec ./spec/features/visitor_visits_public_pages_spec.rb

Visitor visits
 the home page

Finished in 0.12252 seconds
1 example, 0 failures

Randomized with seed 11434
Nice! Now, see how far we got in developing our app without viewing it in the web browser? TDD/BDD is not only best-practice from a stability standpoint, but when done right it can actually speed up development in some cases (especially when testing a feature in a browser that requires many clicks)
OK, now we can go ahead and fire up the server and view our app in the browser:
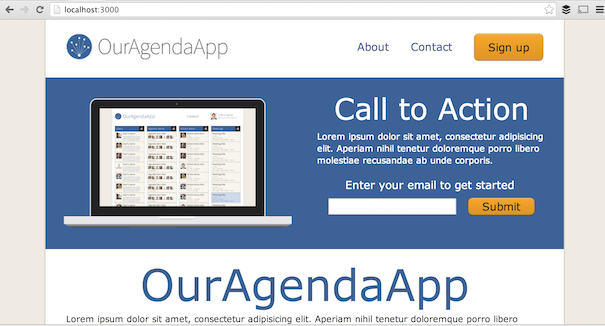
$ rails sPut http://localhost:3000 into your browser and you should see:
Bonus for mac users: if you are connected to the same wifi network as your laptop you can visit http://name_of_your_mac.local:3000/ from your mobile devices to see how it looks (and tweak as needed). If you're not sure what the name_of_your_mac is, go to system preferences -> sharing.
Alright! Your tests are passing and you've made a great process. It's time now to add files to git and make your commit. First check the status…it should look like this:
$ git status
On branch master
Changes not staged for commit:
  (use "git add <file>..." to update what will be committed)
  (use "git checkout -- <file>..." to discard changes in working directory)

modified:   app/assets/javascripts/application.js
  modified:   app/assets/stylesheets/application.css
  modified:   app/views/layouts/application.html.erb
  modified:   config/routes.rb
Untracked files:
  (use "git add <file>..." to include in what will be committed)

  app/assets/images/OAA_logo_web.png
  app/assets/images/facebook-64.png
  app/assets/images/googleplus-64.png
  app/assets/images/laptop_screenshot.png
  app/assets/images/twitter-64.png
  app/assets/javascripts/css3-mediaqueries.js
  app/assets/javascripts/tabs.js
  app/assets/stylesheets/_app.scss
  app/assets/stylesheets/_general.scss
  app/assets/stylesheets/_layout.scss
  app/assets/stylesheets/_reset.scss
  app/assets/stylesheets/_type.scss
  app/assets/stylesheets/_variables.scss
  app/assets/stylesheets/styles.scss
  app/controllers/home_controller.rb
  app/helpers/home_helper.rb
  app/views/home/
  spec/controllers/
  spec/features/

no changes added to commit (use "git add" and/or "git commit -a")
And with that, let's go and and make the commit and push it up to Github:
$ git add .
$ git commit -m "initial homepage hookup"
$ git push
- — -
In the next post in this series we will continue hooking up our home page to get our sign up process working. Previous post: How to setup a Rails app for Test-Driven- and Behavior-Driven Development with Rspec and Capybara-Webkit.