How to create a user interface specifications document (UI Spec)

Continuing forward in our web and mobile development tutorial series, here we'll take a look at what to do next after you have created an Overview Spec and before you create a UI Flow Chart. Coming up with the UI Spec is an essential step for the product lead (usually the same person as the CEO/project lead in a small startup), as it forces them to visualize a rough draft of the app and put it in writing for the team to kick around.
Author's note: check out Startup Rocket's new web app and ops framework for founders spinning up new ventures. The UX flow chart step is a critical part of the "create" stage.
Also, FYI, I wrote the first couple dozen tutorials in this series a few years ago and I'm in the process of updating the content to reflect the evolution of best practices in the industry. Please let me know if you see anything I missed that should be updated. Thanks!
A QUICK NOTE ON ‘HOW' TO KEEP THE UI SPEC SIMPLE
In general, everyone says keep it simple, but few people know what that really means. In the context of building a consumer-facing app, know that even you don't know the answer yet. Seriously. You have to test things rigorously before you even begin to know what ‘simple' is for your app.
Your job here for the UI Spec is to dump out a first draft of features, view-by-view (or page-by-page). Don't stray too far from the Overview Spec. Ask yourself for every feature: “is this absolutely essential in order for us to test our core value hypothesis?”
If you successfully get through a thorough first draft of your UI Spec asking yourself this question, then you'll be in good shape. Don't second guess yourself. Build this product that you come up with and test/iterate later.
OUR SUGGESTED FORMAT FOR THE UI SPEC
Think through every possible view/page of the app, including tool-tips, lightboxes, etc… and just dump out your ideas in bullet-point list within a Google Doc (so your team can easily edit/modify/comment).
For me, armed with the Overview Spec for the app that we're building step-by-step together in this tutorial series, I quickly wrote the following UI Spec for the desktop browser version:
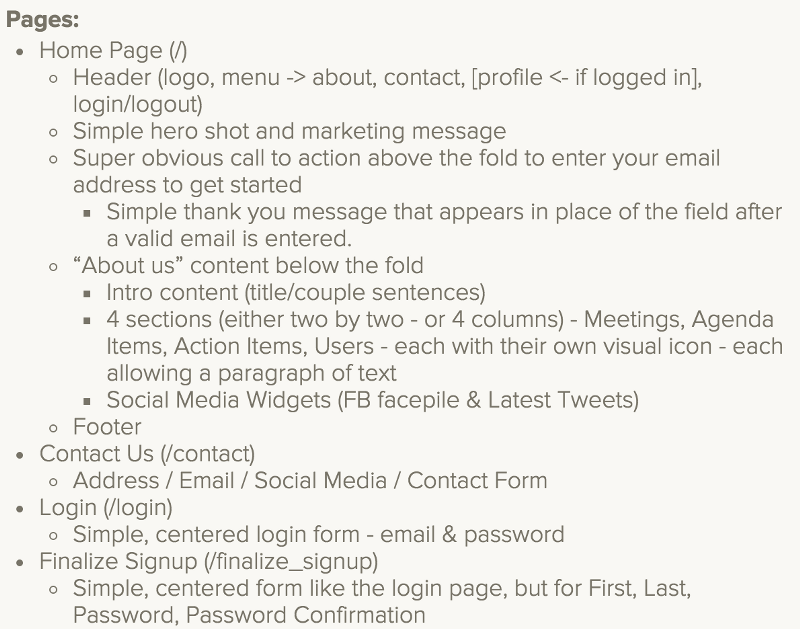
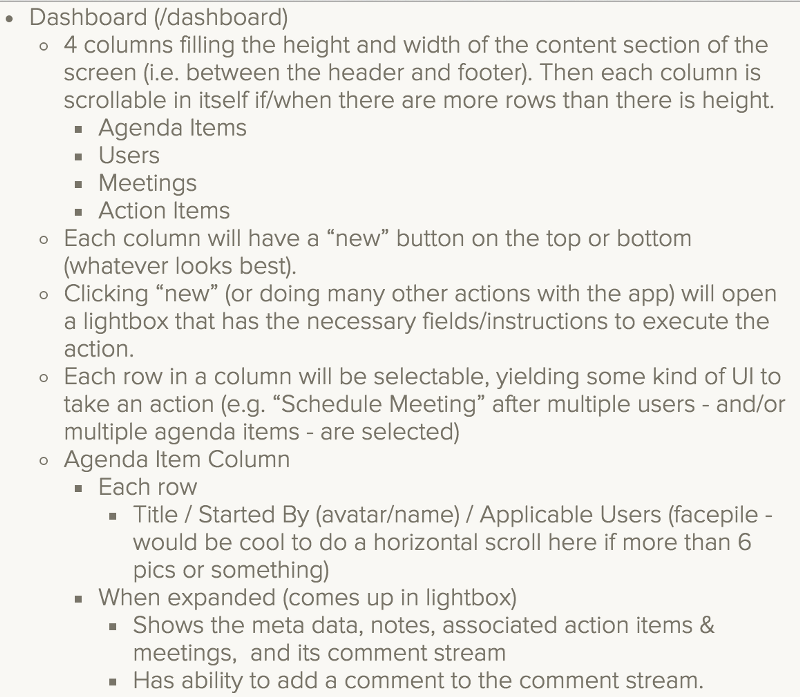

Here are some things I was thinking about as I wrote this up:
- We're heading the mobile direction with the next interface so I wanted to, ideally, think of a UI that would port easily to small screens. These four columns will make simple mobile views that a user can swipe between, and much of the UX (button locations and such) can probably be similar to the desktop version so there will be some continuity between UIs.
- Our designer will likely make this much better than what I can visualize in my head, so I didn't bother to over-think it. In this game you can't be a perfectionist. I wanted to make sure that our four main resources (Users, ActionItems, AgendaItems, and Meetings) were CRUDable (create, read, update, destroy) and that their relationships could be — in theory — understood visually.
- It's not clear to me if the lightbox-opening paradigm will be the final one we go with, but in general it's a good idea to focus a user on their task at hand. Thinking through this UX is pushing the limits of my skills, so — again — I will rely heavily on our designer to finalize the way we release this for our v0 (aka MVP, Minimum Viable Product).
You'll want to make sure each member of your team pours over the UI Spec. It's hard to overstate how important it is that everyone understands the details and is on the same page before you move forward.
- — -
In our next post in this series, we'll walk through how to take this UI Spec and build out a developer-friendly UX Flow Chart using a Google “Drawing” in Google Docs. Linking components of the chart to the current status of wireframes and mockups (which we'll be building together in future posts), is a clean way to stay organized and work remotely with your team.
Previous post: How to work with a designer to quickly produce a logo.